
Not too long ago I kicked off my Debian PPA. While building packages is a rather fixed problem in my case, I haven't published them on my own in quite some time. Back in the day, I used to rely on reprepro, but there were couple of shortcomings and missing features. Later on I stumbled upon Aptly and it has been my go to solution for public repositories in Debian ever since.
One reason I prefer Aptly is the ability to keep multiple versions of the same package in the repository. I know it's maybe not a lot, but it gives me a peace of mind, that should anything go wrong with the newer package version, it will still be in the user's power to downgrade in the worst case.
Another one is API—Aptly can be used locally with the aptly command, but it can also expose REST API. While it's not something I'm using these days, I did so in the past, in my previous job, where I built an entire pipeline for building internal C++ package that was then automatically published into our internal repository. Not something that could have been easily done using reprepro.
When I initially decided to bring back my Debian PPA, I knew straightaway, that I'm going to use Aptly. Here I'm going to describe shortly how I set it up and will also share some of my terrible wrapper scripts I'm using to speed things up with maintaining it.
Setup
First of all, be sure to go through the official Aptly tutorial: Managing repositories of your packages.
Now, a little bit of pain. In order to do things the right way™, you need to choose PGP provider. I went with the ordinary gpg one, as I already had it set up for building packages and I'm signing the repository with the same key. I'm not going to dive deep into the details, but most important steps were to import the key via gpg --import $KEY_FILE_OR_STH and to export the public key for users to download via gpg --export $KEY_ID > keyring.gpg.
Cool, with PGP out of the way, I wanted to create three repositories: bookworm, trixie and unstable. For each I was after the main component (i.e. not contrib or non-free):
aptly repo create -comment="Debian 12" -distribution="bookworm" -component="main" bookworm-main
aptly repo create -comment="Debian 13" -distribution="trixie" -component="main" trixie-main
aptly repo create -comment="Debian Sid" -distribution="unstable" -component="main" unstable-main
In case you made a mistake and/or want to remove one of the repositories, simply drop it a cleanup the local DB:
aptly repo drop bookworm-main
aptly db cleanup
Aptly can be backed by different storage solutions. S3 is all the rage, I know, but I went with the local storage instead and I kept the default hardlink for linking method. My config file is quite boring:
root_dir: /opt/repo
log_level: info
log_format: default
database_open_attempts: -1
architectures:
    - amd64
    - source
skip_legacy_pool: true
dep_follow_suggests: false
dep_follow_recommends: false
dep_follow_all_variants: false
dep_follow_source: false
dep_verboseresolve: false
ppa_distributor_id: ubuntu
ppa_codename: ""
serve_in_api_mode: false
enable_metrics_endpoint: false
enable_swagger_endpoint: false
async_api: false
database_backend:
    type: leveldb
    db_path: ""
    url: ""
downloader: default
download_concurrency: 4
download_limit: 0
download_retries: 0
download_sourcepackages: false
gpg_provider: gpg
gpg_disable_sign: false
gpg_disable_verify: false
skip_contents_publishing: false
skip_bz2_publishing: false
filesystem_publish_endpoints: {}
s3_publish_endpoints: {}
swift_publish_endpoints: {}
azure_publish_endpoints: {}
packagepool_storage: {}
I'm sure most of it are defaults, I may have change the architectures now that I think of it. This file resides in my user's home directory: ~/.aptly.conf.
Adding packages to repository
OK, once the repositories are defined, it's time to import some packages:
# single binary
aptly repo add bookworm-main neovim-0.11.2_amd64.deb

# folder with multiple files
aptly repo add bookworm-main nginx
To add packages to other repositories (trixie and/or unstable), the above step(s) need to be repeated for each. The act of adding is not enough to make it available to download, though. First, package(s) need to become part of a snapshot and then that snapshot needs to be published. Let's do this.
Creating a snapshot
This part was initially the most confusing one. Why do I need a snapshot? Why can't I just publish the package I added? Well, that's still something I'd consider an advantage of Aptly—adding package doesn't change the state of the repository. This is great, you can safely prepare all the changes you want in your repository, then create snapshot of that state and then publish that snapshot. Rinse and repeat.
aptly snapshot create bookworm-20250712-1 from repo bookworm-mainThat's a handful. Name of the snapshot can be whatever you want, but I tend to date them simply because it's easier for me to reason about what time the given snapshot is from. Each repository needs to have at least one snapshot in order for packages to be available for it. Let's publish all the things.
Publishing packages
Finally, the last step is to publish a snapshot. This makes the changes made earlier on live and users, after running apt update, will be able to notice them.
aptly publish snapshot bookworm-20250712-1 debianThis is rather straightforward. The last part, debian, defines how the resulting URL to the repository will look like. In my case, I wanted to have /debian in the repository, that's why I chose what I chose.
Reverse-proxy via NGINX
I tend to publish entire repository behind NGINX's reverse-proxy. I'm using autoindex on; so that anyone can see what's up inside. The simplest setup can look like this:
# HTTP
server {
        listen 80;
        listen [::]:80;
        server_name deb.134340.cc;

        root /opt/repo/public

        location / {
                autoindex on;
        }
}

# HTTPS
server {
        listen 443 ssl;
        listen [::]:443 ssl;
        server_name deb.134340.cc;

        root /opt/repo/public;

        location / {
                autoindex on;
        }
}
Handful of tips
Removing repository in case you no longer need one:
aptly repo drop bookworm-main
aptly db cleanup
Removing packages can get a bit involved. The simplest case is removing single version of a single package:
aptly repo remove --dry-run bookworm-main zoxide_0.9.7-1_amd64Ditch --dry-run to actually remove the stuff. How to list available packages with their versions?
aptly repo show -with-packages bookworm-mainCool. But sometimes you want to remove a lot of old packages to release some disk space. This can be done too:
aptly repo remove --dry-run trixie-main 'pocket-id (<<1.5.1)'All pocket-id package versions lower than 1.5.1 in the trixie-main repository will be removed. Occasionally, though, you might need to remove a package with all of its versions. It can be done in a single step:
aptly repo remove --dry-run bookworm-main '$Source (nginx)'It might need a follow-up with aptly db cleanup.
Creating a new snapshot was covered, but how do you switch between them if you need to? This might be because you added some new packages and you want to publish the new state of the repository, it might be a rollback after finding out some stuff not working as expected. This is done via the switch:
aptly publish switch bookworm debian bookworm-20250712-2This covers most of the bases.
Meet pumper, snaper & puber
I know, I'm just that good with naming things.
While I dig most of the things Aptly, its commands are... Quite verbose. I knew rather fast, that I'll most likely end up with wrapping them into some helper script(s). And I did, eventually, in three different ones. Before I'll write in more details what each script does, let me illustrate the difference:
# Add new package to all repositories
aptly repo add bookworm-main incoming/neovim-0.11.2_amd64.deb
aptly repo add trixie-main incoming/neovim-0.11.2_amd64.deb
aptly repo add unstable-main incoming/neovim-0.11.2_amd64.deb

# Create new snapshot of each repo state
aptly snapshot create bookworm-20250712-1 from repo bookworm-main
aptly snapshot create trixie-20250712-1 from repo trixie-main
aptly snapshot create unstable-20250712-1 from repo unstable-main

# Publish new state of each repository
aptly publish switch bookworm debian bookworm-20250712-1
aptly publish switch trixie debian trixie-20250712-1
aptly publish switch unstable debian unstable-20250712-1
That's a bit too much typing and repetition. Here's how I deal with it now with my helper scripts:
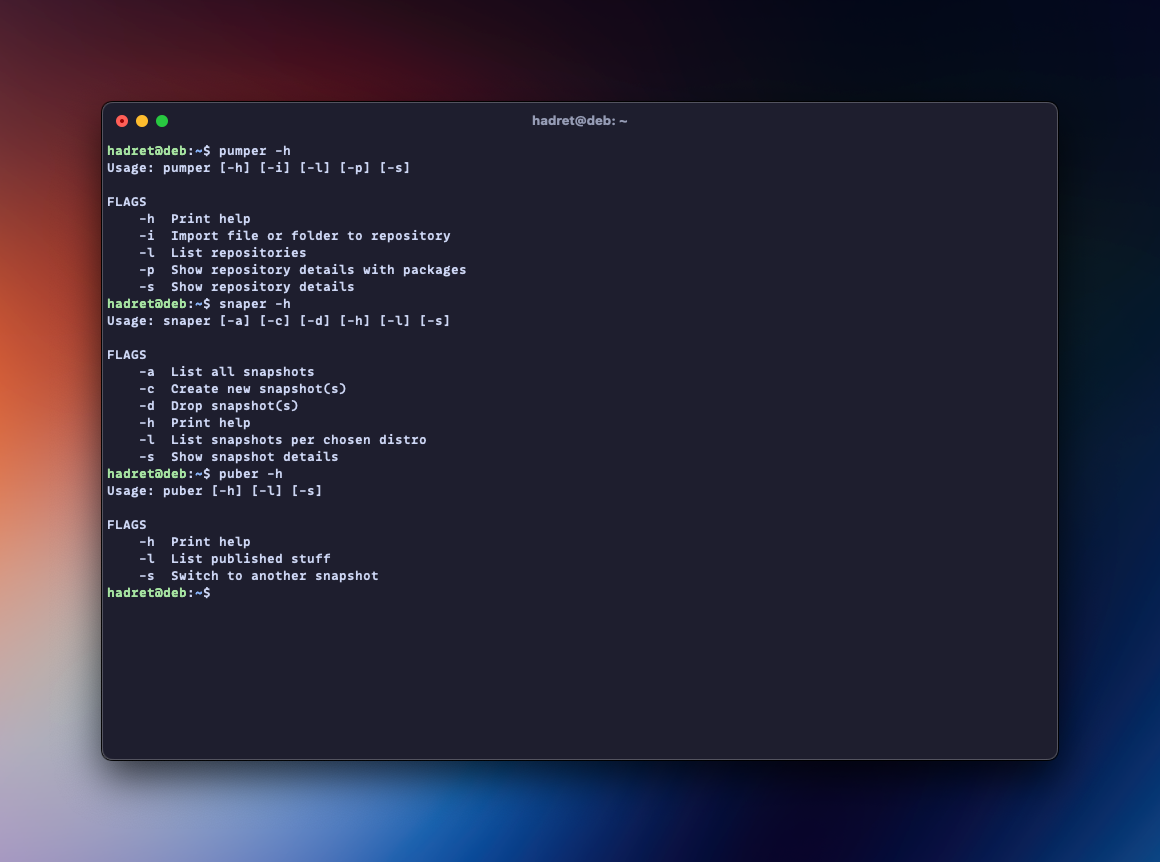
pumper
# Choose which distro you need to add to or ctrl+a to select all
# Choose file(s) or folder(s) for import for each chosen repo

snaper
# Create new snapshots, where names are suggested for each repo

puber
# Publish new snapshots, by choosing from the list of available ones
Faster, eh? Adding new package(s) in the repositories is a three-step process: pump in new packages, snap the new state of the repository and pub it when done. These are the main functions of pumper, snaper and puber. Each script does a bit more so I encourage you to explore what's in there via -h.
Quick demo:
Demo of the amazing trio in action
When I'm not (ab)using fzf for all my scripting, I'm going with charmbracelet/gum. In this case I'm leveraging mostly fuzzy picker, but there's a little bit of its awesome built-in file manager too (for choosing files or folders).
I know, I know, this is amazing. You can find all three scripts here.
Wrap up
Aptly is one of my all time favorite applications. It does its job so well, it's reliable and doesn't get in the way. Maintaining repositories with my helper scripts is a breeze and I don't think I could go back to not having them. If you are looking for software to publish Debian packages, you can't go wrong with this one!

Discussion